top of page

How using AI to cook made my life easier

Easy Homemade Cheese - Queso Panela

  • AI Kitchen
  • Aug 2, 2024
  • 3 min read

Updated: Apr 2

Discover the joy of making your own cheese at home with this simple and delicious queso panela recipe. This fresh, mild cheese is perfect for slicing, grilling, or frying, and adds a delightful touch to any meal. With just a few ingredients and a bit of patience, you'll have a versatile cheese that's sure to impress.

A wooden platter with a large round cheese, surrounded by tomatoes, cucumbers, grapes, lettuce, and nuts on a wooden table. Appetizing and fresh.

I'm so glad you're here! I'm on a mission to document my AI prompting journey in the kitchen. I want to keep this site free of obnoxious ads. If you like my content, please consider supporting me

Recipe

Servings: Approximately 16

Calories per Serving: About 90

Cook Time: 30 minutes

Prep Time: 2 hours

Total Time: 2.5 hours


Easy Homemade Cheese - Queso Panela


A wooden platter with a large round cheese, surrounded by tomatoes, cucumbers, grapes, lettuce, and nuts on a wooden table. Appetizing and fresh.

Ingredients:

  • 1 gallon of whole milk

  • 1 cup of white vinegar or lemon juice

  • 1-2 teaspoons of salt (or to taste)


Instructions:

  1. Pour the milk into a large pot and heat it over medium heat until it reaches around 185°F (85°C). Stir occasionally to prevent scorching.

  2. Once the milk reaches the desired temperature, remove it from the heat and add the vinegar or lemon juice. Stir gently for a few seconds.

  3. Add the salt to the mixture and stir gently to combine.

  4. Let the mixture sit undisturbed for about 10-15 minutes to allow the curds to form. You'll notice the milk separating into curds (solid) and whey (liquid).

  5. Line a colander with cheesecloth or a clean kitchen towel and place it over a large bowl or in the sink.

  6. Carefully pour the curds and whey into the colander, allowing the whey to drain away. You can save the whey for other uses if desired.

  7. Gather the corners of the cheesecloth or towel and tie them together to form a bundle. Hang the bundle over the sink or a bowl to allow excess liquid to drain for about 1-2 hours, or until the cheese reaches your desired consistency.

  8. Once the cheese has drained, unwrap it and transfer it to a plate or container.

  9. Your queso panela is now ready to be sliced and enjoyed! It can be served as is, grilled, or fried.


Nutritional Information (per 1 oz serving):

  • Calories: 90

  • Protein: 7g

  • Fat: 7g

  • Carbohydrates: 1g

  • Calcium: 20% of the daily recommended intake


Enjoy your easy homemade queso panela and delight in the fresh, versatile flavors it brings to your kitchen!

Link to cheese cloth on Amazon - https://amzn.to/4c5qZSU

Link to cheese molds on Amazon - https://amzn.to/4c8eeH7


Prompt

I make this cheese a-lot!!! I prefer mild, white cheese that pairs well with a fresh salad over the yellow heavy stuff. I asked ChatGPT:

How to make queso panela at home?

And it gave me this super easy recipe:

Making queso panela at home is relatively simple. Here's a basic recipe:  Ingredients:  1 gallon of whole milk 1/4 cup of white vinegar or lemon juice Salt (optional)

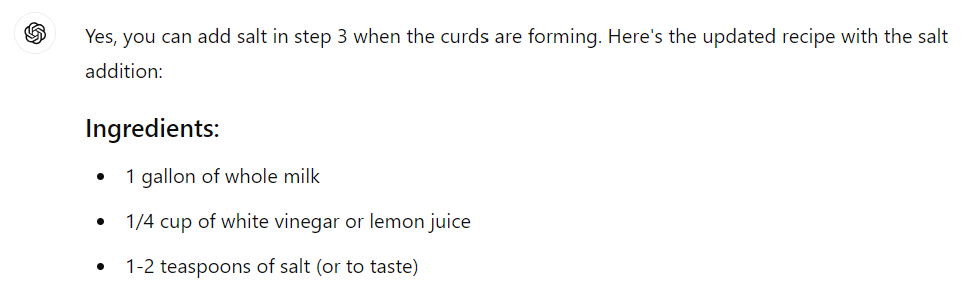
I noticed however, that the salt was added at the end, and I want the cheese to be proper salty, so I asked:

Can I add salt in step 3?

And it assured me that it can be done:

Yes, you can add salt in step 3 when the curds are forming. Here's the updated recipe with the salt addition:  Ingredients: 1 gallon of whole milk 1/4 cup of white vinegar or lemon juice 1-2 teaspoons of salt (or to taste)

As I started making the cheese, I noticed that curding wasn't going very well, so, I asked ChatGPT to update the recipe:

It didn't curd enough, so I ended up with using a total of 1 cup of distilled white vinegar

It then responded:

It's good to know that using more vinegar helped with curdling. Sometimes, the curdling process can vary depending on factors like the type of milk used and its temperature. If you try the recipe again, you might start with adding more vinegar right away or ensure the milk is heated to the proper temperature before adding the acid.

Scroll to the top for the final (very delicious and easy to make) outcome.


2 Kommentare

Mit 0 von 5 Sternen bewertet.
Noch keine Ratings

Rating hinzufügen
Gast
02. Apr.
Mit 5 von 5 Sternen bewertet.
Gefällt mir

Gast
20. Aug. 2024
Mit 5 von 5 Sternen bewertet.

Came out great!!

Gefällt mir

Don't Miss Out

Sign Up and Get All My Recipes

Thanks for submitting!

bottom of page