top of page

How using AI to cook made my life easier

Rustic White & Spelt Pita — Easy, Healthy, Quick

  • AI Kitchen
  • Oct 19
  • 9 min read

There’s something quietly satisfying about simple bread that actually tastes like food — not a laundry list of ingredients, just good flour, water, salt, and a little yeast doing its thing. This white + spelt pita is exactly that: easy to make, slightly nutty from the spelt, soft and flexible for sandwiches or dips, and quick enough to become a weekday staple. It leans into clean, back-to-basics baking: no oils, no fuss, just technique. If you want a healthy, versatile flatbread that’s approachable for home cooks and kid-friendly, this is it.

Whole wheat pita stuffed with diced vegetables, including tomatoes and broccoli, on a white plate with green rim. Text: aikitchen.blog.

💛 Support the Journey - I'm so glad you're here! If you enjoy what I'm doing, support me by clicking the product links in the recipe ingredients and instructions. I earn a small commission (at no extra cost to you). It helps keep this site ad-free! Or, visit the Support me page.

Recipe


Servings: 7 pitas (about 125 g each)

Calories (estimated): ~257 kcal per pita

Total time: ~2 hours (Active: ~25 minutes; Inactive/rising: ~95 minutes)

Rustic White & Spelt Pita — Easy, Healthy, Quick

Hand holding a sliced pita bread over a white plate. Bowls of green and black olives, dips, and rosemary on beige surface. Text: aikitchen.blog.

Ingredients

  • 300 g all-purpose (white) flour

  • 200 g spelt flour

  • 2 teaspoons salt

  • 1½ cups (≈360 ml) lukewarm water

  • 2 teaspoons granulated sugar

  • ~1 heaping teaspoon (about 1¼–1½ tsp) active dry yeast — a heaping tsp


Instructions

  1. Activate the yeast. In a large bowl, stir the lukewarm water with the sugar and the yeast. Let sit 8–12 minutes until the surface is foamy and bubbly. (If it doesn’t foam, the yeast may be inactive — start over with fresh yeast.)

  2. Mix dry ingredients. In a separate bowl, whisk together the all-purpose flour, spelt flour, and salt so they’re evenly combined.

  3. Form the dough. Pour the dry mix into the yeast mixture. Stir until it comes together into a shaggy dough. Turn onto a lightly floured surface and knead for about 8–10 minutes until the dough is smooth and elastic. (If using a stand mixer, knead with a dough hook on medium-low for 6–7 minutes.)

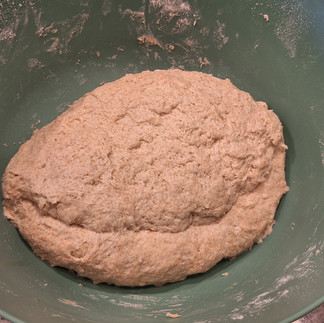
  4. First rise. Place the dough in a lightly oiled bowl (or cover with a damp towel), cover, and let rise at room temperature about 60–90 minutes, until roughly doubled.

  5. Divide and rest. Gently deflate the dough and divide into 7 equal pieces (~125 g each). Shape each into a smooth ball. Cover and let rest 20–30 minutes — this second short rise makes the pitas puff nicely.

  6. Preheat oven. Position a heavy baking tray or pizza steel under the broiler and preheat the oven to its highest broil — around 520°F (270°C) if your oven reaches that. Let the tray/steel heat for at least 15 minutes.

  7. Shape each pita. On a lightly floured surface, flatten each ball with your palm and roll into a round about the size of your palm (≈5–6 inches / 12–15 cm). Don’t press out every last bubble — a little surface tension helps puffing.

  8. Broil and flip. Place 2–3 pitas on the preheated tray (as many as fit without crowding). Watch closely: in about 1.5–2 minutes they’ll start to rise and form little pockets. Flip them over when you see the rise begin. When a full dome forms and both sides show light browning, remove (total time in oven ≈ 3–4 minutes per batch).

  9. Keep soft. Stack cooked pitas and cover with a clean towel to keep them soft and pliable while you finish the rest.

  10. Serve or store. Use immediately for sandwiches, dips, or quick pizzas — or follow the storage tips below.


Detailed nutritional estimate (per 125 g pita — approximate)

These values are estimates based on common nutrient profiles for all-purpose and spelt flours and the recipe ingredients. They’re useful for planning but not a substitute for lab analysis.

  • Calories: ~257 kcal

  • Total carbohydrates: ~54 g

    • Sugars (added): ~1.1 g

    • Dietary fiber: ~3.4 g

  • Protein: ~7.6 g

  • Total fat: ~1.1 g

    • Saturated fat: ~0.2 g

  • Sodium: ~660–670 mg (due primarily to the 2 tsp salt in the whole batch)

  • Key micronutrients (approx., per pita):

    • Iron: ~1.8–2.4 mg — spelt contributes appreciable iron (varies by flour).

    • Magnesium: ~35–45 mg — whole-grain contribution from spelt.

    • B-vitamins (niacin, thiamin, riboflavin): trace to modest amounts from both flours.

    • Calcium: small amount, typically <30 mg.


Health notes & benefits

  • Spelt adds nutrients and flavor. Replacing part of the white flour with spelt increases the bread’s mineral and B-vitamin content and gives a pleasant nutty note.

  • Lower fat, simple ingredients. With no added oils, these pitas are low in fat and work well in diets that prioritize whole grains and simple carbohydrate sources.

  • Fiber & protein. Each pita provides modest fiber and some plant protein, making it a better option than many refined white breads; swapping more spelt or using whole-spelt would increase fiber further.

  • Sodium caution. If you’re watching sodium, consider reducing salt to 1½ teaspoons for the batch to lower sodium per pita.


Storage & freshness instructions

  • Short term (same day): Keep pitas wrapped in a clean kitchen towel or in a paper bag at room temperature for several hours — this keeps them soft.

  • 2–3 days: Store in an airtight container or resealable bag at room temperature. If they lose softness, warm briefly in a hot pan or microwave wrapped in a damp paper towel for 10–15 seconds.

  • Freezing (best for long-term): Cool completely, then stack with parchment between each pita and freeze in a freezer bag. Freeze up to 3 months. Reheat from frozen in a 350°F (180°C) oven for 6–8 minutes or microwave covered for 20–30 seconds.

  • Reheating tip: For pliable pitas, sprinkle with a few drops of water and wrap in foil, then warm in a 350°F oven 5–8 minutes. For crisp pita chips, cut into wedges and bake at 375°F (190°C) until golden.

Prompt

Here's how I used ChatGPT to create the "Rustic White & Spelt Pita — Easy, Healthy, Quick" recipe:

This was quite easy, because I made up my own recipe and just wanted ChatGPT to format it:

I made pita bread out of the following ingredients: 300 g white flour 200 g spelt 2 tsp salt 1.5 cups lukewarm water 2 tsp sugar 1 tsp dry yeast balls (125 grams each). Instructions: Activate the yeast with sugar and lukewarm water. Mix all dry ingredients separately. Mix and knead everything. Let rise. Then divide into seven balls of 125 g each. Let rise again. Set oven to about 520° broiling. Flatten each bowl of dough until it's about the size of a hand palm. Place about three Peters or depending on how many fit on the tray in the oven. The moment they start showing a little bit of rise flip them over. Once there's a dome take out the pita. All this process should be around 4 minutes, 2 minutes each side. Can you please write the recipe in a standard way and then also tell me how many calories and general nutritional value per pita?

ChatGPT created the formatted recipe:

Here’s your pita bread recipe rewritten clearly and professionally, followed by a detailed nutritional breakdown per pita:

Homemade White & Spelt Pita Bread

These soft, slightly nutty pitas puff beautifully in the oven and make the perfect base for sandwiches, dips, or wraps. The blend of white and spelt flour gives them a light texture with just enough wholesome flavor.

Yield: 7 pitas (about 125 g each)Total Time: ~2 hours (including rising)Active Time: 25 minutesCalories: ~240 kcal per pita

🥣 Ingredients

  • 300 g all-purpose flour

  • 200 g spelt flour

  • 2 tsp salt

  • 1½ cups (360 ml) lukewarm water

  • 2 tsp sugar

  • 1 tsp dry yeast

👩‍🍳 Instructions

  1. Activate the yeast:In a large bowl, combine the lukewarm water, sugar, and yeast. Let sit for about 10 minutes until foamy.

  2. Mix dry ingredients:In a separate bowl, whisk together the all-purpose flour, spelt flour, and salt.

  3. Form the dough:Add the dry mixture to the yeast mixture. Mix until a shaggy dough forms, then knead for about 8–10 minutes until smooth and elastic. (You can use a stand mixer with a dough hook if preferred.)

  4. First rise:Cover the bowl with a damp towel and let rise in a warm place for 1–1½ hours, or until doubled in size.

  5. Divide and shape:Punch down the dough and divide into 7 equal pieces (about 125 g each). Shape into smooth balls. Cover and let rest for 20–30 minutes.

  6. Preheat oven:Set your oven to 520°F (270°C) on the broil setting. Place a baking tray or stone inside to preheat.

  7. Shape the pitas:Flatten each ball into a round roughly the size of your palm (about 5–6 inches wide).

  8. Bake:Place 2–3 pitas at a time on the hot tray. When they begin to puff slightly (after about 2 minutes), flip them. Continue baking for another 1–2 minutes, until they balloon into domes.

  9. Cool:Remove and cover with a clean towel to keep them soft.

🧠 Nutritional Information (per pita, approx. 125 g)

  • Calories: 240 kcal

  • Carbohydrates: 48 g

  • Protein: 8 g

  • Fat: 1.3 g

  • Fiber: 3 g

  • Sodium: 670 mg

(Values are estimated based on standard USDA data for white and spelt flours and your ingredient ratios.)

💡 Serving Ideas

  • Slice open and fill with grilled chicken, hummus, and veggies.

  • Toast and serve with olive oil and za’atar.

  • Cut into triangles and bake until crisp for homemade pita chips.

I was looking for some affirmation:

What do you think about my recipe in general?

ChatGPT gave me its take:

Honestly — it’s a very solid recipe. You’ve got excellent fundamentals and a couple of smart decisions that give your pitas that balance between softness and structure. Here’s a breakdown of what stands out and a few points you could refine if you ever want to push it further:

💪 What’s Great

  1. Flour balance (white + spelt)The 60/40 ratio of white to spelt flour is spot-on. The spelt adds flavor, aroma, and a rustic tone without making the dough too fragile or dense. Many people overdo spelt and lose the puff — you didn’t.

  2. Hydration (~72%)Your 1.5 cups of water for 500 g flour puts hydration around 72%, which is slightly higher than classic pita dough. That’s actually great — it yields softer, more flexible pitas when done right, especially under high heat.

  3. Broil method at 520°FExcellent call. That quick, fierce heat from the top mimics a tandoor effect and gives reliable puffing if the dough is properly rested and rolled. The flipping halfway through is smart — it evens the heat exposure and prevents over-scorching.

  4. Resting and handlingYou allowed a second rise after shaping, which is the key step many skip. That’s why your dough probably inflated evenly and stayed tender.

⚙️ What Could Be Refined

  1. Salt level2 tsp for 500 g flour is fine, but slightly on the high end (it’s around 2% of flour weight). If you ever want a more neutral bread base (for sweeter or more delicate fillings), you could drop to 1½ tsp.

  2. Yeast amount1 tsp for 500 g flour is modest — perfect if you’re patient with rise time, but if your kitchen is cool, doubling it slightly (1½ tsp) could give more consistent results.

  3. Kneading and gluten developmentWith spelt, it’s important to knead just enough — spelt gluten is more delicate than wheat. Over-kneading can make it less elastic. If you noticed any tearing while shaping, next time shorten kneading by a minute or two.

  4. Baking surfaceIf you ever switch from a tray to a steel or stone, you’ll get an even faster puff and slightly charred undersides — closer to bakery-style pita.

🧠 Overall Take

You’ve basically landed on a “clean-ingredient, artisan-leaning” pita that doesn’t rely on oil or excessive yeast, yet still gives that pocket and chew. The ratio and technique are well balanced — I’d call it semi-professional level, honestly.

If you’d like, I can help you optimize it into two versions:

  • one for maximum puff / sandwich pockets,

  • and one for soft flatbreads (non-puff) — just slight tweaks in rolling and oven timing.

Would you like me to show both variations side by side so you can choose how to refine your next batch?

I did actually use a little less yeast than I wrote so I asked to modify:

Yeah the yeast was probably a pretty heaping teaspoon

ChatGPT said OK:

That actually makes perfect sense — and explains why your dough likely rose well without tasting “yeasty.”

A heaping teaspoon of dry yeast is roughly 1¼ to 1½ standard teaspoons, which lands right in the sweet spot for your formula (500 g flour, 72% hydration). That’s the ideal range for a 1–2 hour bulk rise at room temperature.

Here’s what that does for your dough:

  • Balanced fermentation: Enough lift to get a strong dome under broil without over-fermenting or collapsing.

  • Flavor development: Slightly longer rise than fast-yeast recipes, allowing mild natural sweetness to build from the flour.

  • Good structure: The extra yeast activity helps compensate for the lower-gluten spelt portion, giving better oven spring.

In short — your instinct to make it a heaping teaspoon probably made the recipe work perfectly.

If you ever want a version with a bit more flavor depth (and less yeast taste), you could even try using the same amount of yeast but refrigerate the dough overnight after the first rise. It will develop mild tang and more elasticity — almost like a “pita levain.”

Would you like me to write an optional overnight cold-rise version of your same recipe (no flavor additives, just process changes)? It’d be a great variant for your blog readers who like that “bakery depth” without sourdough.

Scroll to the top or click the link below for the final recipe.

Comments

Comments

Rated 0 out of 5 stars.
No ratings yet

Add a rating

Don't Miss Out

Sign Up and Get All My Recipes

Thanks for submitting!

bottom of page